
I'd been driving for 16 years before I had to take a driving test all over again. Terrified is a fair word for it. Here's the entire NY road test broken down: every point you can lose on the 2026 scoring sheet, my exact parallel park technique, the booking process, and what actually happens on test day. With this, you'll pass on the first try.
I passed the New York road test, and I went through the whole process of getting my learners permit too. Quick disclaimer: I'm not a professional driving instructor, and I'm not affiliated with any of the schools mentioned below. Everyone's experience is slightly different.
It's also worth noting that even if you have a valid foreign license, you can't just keep driving on it once you become a resident of New York. If you're confused about the difference, I've written a separate piece on that — start there if you haven't already.
The 30-point rule, explained simply
The NY road test uses a points-deducted scoring system. You start the test with zero points and the examiner adds points for every mistake. You pass if you finish with 30 points or fewer. You fail at 31 or more.
That's a critical thing to internalize: a perfect score is zero, and you have a meaningful margin to play with. You don't have to drive flawlessly. You just have to avoid catastrophic errors and accumulate fewer than 31 small ones.
There are also automatic fails that end the test instantly regardless of your point total. The big ones: hitting the curb during your parallel park, running a red light, causing an accident, or being told to drive back to the test site by the examiner. We'll cover all of these.
What you need before you can take the test
Before you can sit the road test, you need three things in place:
- A learner permit. You get this by passing a 20-question multiple-choice written test at the DMV. You need at least 14 right to pass. I've written the full guide to passing the written test on your first shot here.
- A pre-licensing course certificate (MV-278) or driver education certificate (MV-285). New York requires a 5-hour pre-licensing course before you can sit the road test. I've written about how this works — and good news, it's now available on Zoom.
- Practice time. New York doesn't mandate a minimum number of hours for adults, but you should have at least a few weeks of comfortable driving on the right-hand side of the road behind you before you book the test.
If you're under 18 there are additional requirements (50 hours of supervised practice, 15 of them at night, 10 in heavy traffic, plus a 6-month wait after getting your permit). Most of my readers are adult expats so I won't go deeper on the under-18 process here — the DMV has the full breakdown.
How to schedule your road test
Once you have your learner permit and your pre-licensing certificate, you can schedule your road test online through the NY DMV's road test scheduler.
You'll need:
- The 10-digit ID number from your learner permit
- The ZIP code of where you want to take the test (this doesn't have to be where you live)
- A valid email address
A few things to know:
- Wait times in 2026. The earliest available appointment is usually 3–5 weeks out. During summer and school break peaks, it can stretch to 8–10 weeks. Book as soon as you've completed your pre-licensing course.
- There are no waiting lists. If you want a sooner slot, check the scheduler at odd hours — cancellations open up regularly.
- Tests are almost always weekdays. Saturday slots exist but are rare.
- You can test anywhere in NY. You don't have to test in your home county. More on location strategy below.
What to bring and how to prep your car for test day
This is where a lot of people get caught out. Show up missing one item and the examiner can refuse to test you, and you've burned the appointment.
What you must bring with you:
- Your valid New York learner permit (the physical card — Mobile ID / MiD is not accepted as of 2026)
- Your original, unexpired pre-licensing course certificate (MV-278 or MV-285)
- Your appointment confirmation
- The licensed driver who drove you to the test (must be 21+ if they're driving you to the site, 18+ if you drove yourself)
Your car must have:
- Current registration, insurance, and inspection sticker
- A windshield with no cracks that block the driver's view
- Working brake lights, turn signals, headlights, and taillights
- Working horn, speedometer, rearview mirror, seatbelts, and windshield wipers
- Doors that open from inside and outside on both driver and passenger sides
Use your car or rent one. Driving schools like DriveRite (more on them below) will rent you a car for the test if you don't have one — this is what I did. They also pre-check the vehicle so it'll definitely meet requirements.
A few things that won't get flagged on the scoring sheet but will help your nerves:
- Arrive 15 minutes early. Don't show up at 8:00 for an 8:00 test.
- Clean the inside of the car. The examiner has to sit in it for 10–15 minutes.
- No passengers other than your accompanying driver. They wait outside during the test.
- Turn the radio off before the examiner gets in. You need to hear instructions clearly.
Where to take the test: NYC borough comparison
This is the question almost no one tells you to think about, and it can genuinely affect your odds.
The road test isn't standardized in difficulty across locations. Different test sites have different routes, traffic conditions, and reputations.
- Staten Island. Generally regarded as the easiest NYC site. Wider streets, lighter traffic, more forgiving routes. If you're nervous and you have flexibility, this is worth the trek.
- Bronx and Queens. Mid-difficulty. Mix of residential and commercial roads. Decent if you're comfortable with city driving.
- Brooklyn. Harder reputation. Heavier traffic, narrower streets, more double-parked cars to navigate around.
- Outside NYC. Sites in upstate counties tend to have lighter traffic and easier routes. If you have a car and an hour to spare, this is the easy mode many New Yorkers use.
The DMV publishes the full list of test sites here. Search by ZIP code in the scheduler to see what's available.
Planning the rest of your prep
Long story short: the test isn't hard, but it's easy to fail if you treat it casually.
Where possible, log some driving time on the right side of the road before test day. Get familiar with American signs, traffic flow, intersection rules, and the feel of an LHD (left-hand drive) car. A lot of expats rent a car or use ZipCar for this. Just make sure you're driving legally with your learner permit and a licensed adult in the passenger seat.
Take a lesson before the test. I know, I know — “but I've been driving for years.” That was my position too. Here's what changed my mind: the lesson isn't teaching you how to drive. It's teaching you how to pass this specific test. Those are two very different things.
Driving experience makes you a better driver. But the test is a checklist, and many of the checklist items aren't about whether you're a “good” driver — they're about whether you're overtly demonstrating attention in the way the examiner wants to see.
I used DriveRite. They explain the foreign-driver problem better than I can:
“Foreign drivers that have been on the road for many years in other countries may assume that they are ready to pass the road test in New York. Upon applying for a permit, however, they learn that they must go through the entire process. Drivers accumulate bad habits over the years, and they may not realize that they can potentially fail the test with maneuvers that they think are okay. With a combination of your experience and our expertise, we will help you pass the test on your very first try.”
I signed up for a package that bundles the 5-hour course, a lesson, the test booking, and the test car — they call them “Brush Up”, “Rush”, and “Super Rush” plans. Whichever school you use, the bundled package option is worth considering.
The full 2026 scoring sheet: every point you can lose
Here's the entire breakdown of what the examiner is watching for, organized by section. Every entry includes my tip for avoiding it.
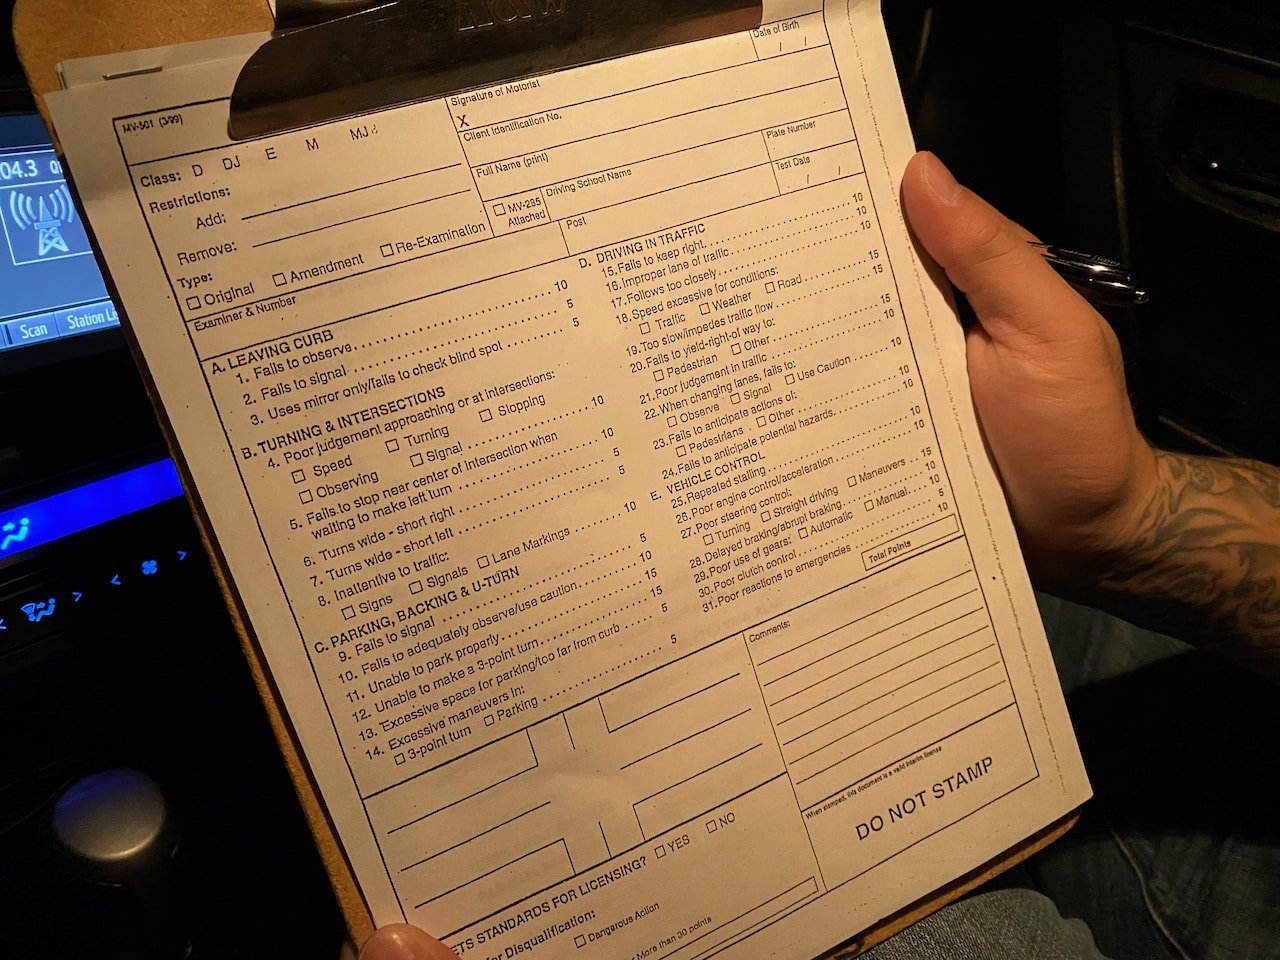
Section 1 — Leaving the curb
This happens at least twice: when you start the test, and when you pull off after your parallel park.
| Violation | Points | My tip |
|---|---|---|
| Fails to observe | 10 | Don't pull out in front of any traffic. Wait for a clean gap. |
| Fails to signal | 5 | Leave your indicator on for a few extra seconds so the examiner sees it |
| Uses mirror only / fails to check blind spot | 5 | Turn your head over your shoulder and make it visible. This applies to the whole test — keep your head moving. |
Section 2 — Turning and intersections
There will be lots of these. The single biggest section by points-at-risk.
| Violation | Points | My tip |
|---|---|---|
| Poor judgment approaching or at an intersection — speed | 10 | Keep it slow when you turn |
| Poor judgment approaching or at an intersection — turning | 10 | Stay in your lane through the turn |
| Poor judgment approaching or at an intersection — stopping | 10 | Stop well behind the line |
| Poor judgment approaching or at an intersection — observing | 10 | Check for pedestrians; don't take off if there's any traffic |
| Poor judgment approaching or at an intersection — signal | 10 | Use that indicator |
| Fails to stop near center of intersection when waiting to make a left turn | 10 | When turning left, roll out into the middle of the intersection. Don't stop and wait to enter. Don't roll into oncoming traffic before it's clear. |
| Turns wide — short right | 5 | Right turns into the closest lane. Don't drift into the next one. If there's an obstruction, turn into the close lane first, then signal a lane change around the obstruction. |
| Turns wide — short left | 5 | Same principle — turning left onto a multi-lane one-way street, don't drift |
| Inattentive to traffic — signs | 10 | Don't ignore signs |
| Inattentive to traffic — signals | 10 | Traffic lights, other cars, pay attention |
| Inattentive to traffic — lane markings | 10 | Be aware of where you're stopping at stop signs. Know when you can and can't change lanes (solid line vs. dashed). |
Section 3 — Parking, backing, and U-turn
This is the one that catches the most people. The parallel park alone is the single highest-risk maneuver of the test.
| Violation | Points | My tip |
|---|---|---|
| Fails to signal | 5 | Indicate well in advance, leave it on for the count of three before starting |
| Fails to adequately observe / use caution | 10 | Head on a swivel before backing up. If there's traffic or pedestrians, wait. |
| Unable to park properly | 15 | This means you fundamentally couldn't complete the maneuver. My step-by-step parallel park technique is below. |
| Unable to make a 3-point turn | 15 | Don't do a U-turn — that's an instant fail of the 3-point. Look over your shoulder before going backward. Slow and deliberate at every step. |
| Excessive space for parking / too far from curb | 5 | Sacrifice these 5 points before you sacrifice your test. Hitting the curb is an automatic fail. Park 2 feet away if you have to. |
| Excessive maneuvers — 3-point turn | 5 | Means it became a 4-point turn. Not the end of the world. |
| Excessive maneuvers — parking | 5 | Means you needed to slightly adjust after the parallel. Fine to do this if it saves you from hitting the curb. |
Section 4 — Driving in traffic
This is the bulk of the test. Most of your time will be spent here.
| Violation | Points | My tip |
|---|---|---|
| Fails to keep right | 10 | Drive on the right side. On a one-way single-lane street, aim for the center, slightly right. |
| Improper lane of traffic | 10 | Be in the correct lane for what you're doing |
| Follows too closely | 10 | Always be able to see the rear wheels of the car in front, even when stopped. Give yourself plenty of space. |
| Speed excessive for conditions — traffic | 15 | Heavy traffic? Slow down. |
| Speed excessive for conditions — weather | 15 | Bad weather? Slow down. |
| Speed excessive for conditions — road | 15 | Potholes? Slow down. (My instructor told me to stick to 20–25 mph for the whole test.) |
| Too slow / impedes traffic flow | 15 | Don't be doing 5 mph in normal traffic. But driving slightly under the limit is fine. |
| Fails to yield right-of-way to pedestrians | 15 | Pedestrians always have right of way. Even if they shouldn't, give them space. |
| Fails to yield right-of-way to other | 15 | At a 4-way stop, drive in the order you arrived. Same time? Yield right. Yield signs and stop signs work as expected. |
| Poor judgment in traffic | 10 | Look around. Be aware of how traffic around you is behaving. |
| Fails to observe when changing lanes | 10 | Head on a swivel |
| Fails to signal when changing lanes | 10 | Signal first, then act |
| Fails to use caution when changing lanes | 10 | Don't change into another car |
| Fails to anticipate actions of pedestrians | 10 | Give them lots of space and lots of time |
| Fails to anticipate actions of others | 10 | Assume other drivers will do something unpredictable |
| Fails to anticipate potential hazards | 10 | If you see something ahead, narrate it: “I can see a truck up ahead so I'm slowing to move around it when safe.” Showing you've spotted a hazard is what gets the credit. |
Section 5 — Vehicle control
| Violation | Points | My tip |
|---|---|---|
| Repeated stalling | 10 | If you're stalling an automatic, you may have a different problem |
| Poor engine control / acceleration | 10 | Practice in your test car before the test if you can |
| Poor steering control — turning | 15 | Make turns precise. Hand-over-hand. |
| Poor steering control — straight driving | 15 | Both hands on the wheel at 10 and 2. Easy to forget if you've been driving for years. |
| Poor steering control — maneuvers | 15 | Clear, defined, no wobbly bits |
| Delayed braking / abrupt braking | 10 | Brake slowly and evenly. Coast into intersections. Never let the examiner have to use their brake — that's an instant fail. |
| Poor use of gears | 10 | If you're failing this in an automatic, something's wrong |
| Poor clutch control | 5 | Stop reaching for the clutch — it's an automatic |
| Poor reactions to emergencies | 10 | Watch for emergency vehicles. Pull over safely. Don't obstruct them. |
My step-by-step parallel park technique
This is the maneuver that fails more people than any other. It's also entirely learnable. Here's the technique I used to pass on my first try:
- Pull alongside the car parked in front of your spot. Line up your front mirrors, about 2 feet apart.
- Rotate the wheel two full turns to the right and roll backward. You want to get the car to a 45-degree angle with the curb. You'll know you've hit 45 degrees because in your right-side mirror, your door handle will appear to touch the curb (my instructor called this “seeing a wedge of street pizza” — it makes more sense once you see it).
- At 45 degrees, stop.
- Rotate the wheel back to straight (two turns left). Now roll back far enough that the front of your car clears the back of the car next to you. This is the only step that uses some instinct, but it's not far. Stop.
- Rotate the wheel one full turn to the left and roll backward. This slowly lines you up with the curb. When you think you're straight, stop.
- Rotate the wheel back to straight (one turn right) and roll forward a small amount.
You should be perfectly parked.
If you're not, don't panic and don't hit the curb to fix it. Pull forward, reset, and re-do the maneuver. Excessive maneuvers cost 5 points; hitting the curb costs you the test.
The single biggest tip in this entire article
If you take one thing away from this guide, take this:
You will instantly fail the test if you hit the curb during the parallel park. Don't hit the curb.
Sacrifice 5 or even 10 points by parking too far from the curb instead. That will pass the test easily — even if it feels strange to be 2 feet away from the curb, you'll be much happier than having to come back in 14 days for another try.
Hitting the curb is the #1 reason experienced drivers fail this test. They get cocky, try to nail a textbook park, and clip the curb fixing it. Don't be one of them.
After the test: how to check your results in 2026
Here's a 2026 change worth knowing: you no longer get a printed scoring sheet at the end of the test.
The examiner will tell you on the spot whether you passed or failed. But for the full breakdown of what cost you points (or a written confirmation if you passed), you check online after 6:00 PM on the day of your test:
roadtestresults.nyrtsscheduler.com
If you passed, you'll be able to print an interim license directly from that site. Carry it with your learner permit until your photo license arrives in the mail (usually within 2 weeks).
If you didn't pass, the same site shows you exactly which items cost you points. Use this to focus your practice for the retake.
What happens if you fail
About 45% of first-time test-takers in New York don't pass on the first try. So if it happens to you, you're in good company.
Here's how the retake process works:
- You can re-book immediately, but you must wait at least 14 days before taking the test again.
- Your $80 license application fee covers your first two road tests. If you fail the first, the second is free.
- If you fail twice, you pay another $10 for the next two attempts.
- Your learner permit stays valid until its expiry date — you don't have to re-apply for the permit.
If you do fail, the most useful thing you can do is read your online results carefully. Failures cluster around a small number of issues. Identify yours, practice them specifically, and book the retake.
Frequently asked questions
You can score up to 30 points and still pass. Anything 31 points or above is a fail. You begin the test at zero and the examiner adds points for each mistake.
Hitting the curb during your parallel park, running a red light, causing or nearly causing an accident, refusing to follow the examiner's instructions, or any unsafe action that requires the examiner to intervene with the vehicle. These end the test instantly regardless of your point total.
The actual driving portion takes 10–15 minutes. Plan to spend 30–45 minutes total at the site to allow for paperwork, vehicle inspection, and the wait between arrival and your slot starting.
Yes, as long as the vehicle has current registration, insurance, and inspection, and meets safety requirements (working lights, brakes, mirrors, doors, seatbelts, etc.). If you don't have a car, driving schools rent test-ready cars by the hour.
It isn't required, but I strongly recommend it. The lesson isn't teaching you how to drive — it's teaching you how to pass this specific test. Even experienced foreign drivers benefit from one or two lessons that focus specifically on what NY examiners look for.
Staten Island has the strongest “easier site” reputation among NYC test centers — wider streets, lighter traffic, more forgiving routes. Brooklyn is generally considered the hardest. If you have a car and time, sites in upstate counties are often the easiest of all.
You can re-book the test immediately but you have to wait at least 14 days before sitting it again. Your original license application fee covers your first two attempts. After that you pay $10 more for the next two. Read the online results page (roadtestresults.nyrtsscheduler.com) to see exactly where you lost points, and focus your practice there.
No. To take the road test you need a valid New York learner permit, regardless of what licenses you hold elsewhere. I've written about whether you can drive on your foreign license at all here.
No. As of 2026, the NY DMV does not accept Mobile ID (MiD) at road test sites. You must bring your physical learner permit card.
Disclaimer: I'm not a professional driving instructor, lawyer, or DMV employee. Information is current as of 2026 but DMV processes change — check dmv.ny.gov for the latest official requirements before your test.


If that all sounds too hard go to Wyoming! 25 Questions on the road rules. First question, I kid you not, was what is 2+2 and they did mean the numbers not the style of car. Rest of the questions were more relevant. 20 right to pass.
Prior to the driving test I spent some time practicing parallel parking as I was not to familiar with it in a LHD Car. On the test the examiner gave me a little talk about pitfalls experienced driver may have taking the test. Then I asked whether I should switch the hill start assist off. He looked at me as if I had just confirmed that an Anglo Australian driving a V8 manual transmission Mustang on a driving test must be completely insane. We then went for a gentle drive around town. No Hill start. No parallel parking, no reversing, no emergency stop, that was it.
Thank you for this explanation and elaboration
Story from an American living in New South Wales… First, I was amazed all I had to do was hand over some cash and show my American drivers license to get one in Australia. After some years, I decided to go back to California to work, and my California drivers license had expired. There was more than one reason for me to renew my California license, even though I wasn’t sure how long I’d be staying. I didn’t have to take the driving test, but I had to take the written test(s). I passed the automobile exam, but failed the separate motorcycle exam. The tricky questions in my mind are numbers – how many feet ahead of a turn are you supposed to signal? But there were some odd motorcycle-specific questions I guessed on. By the time it was graded, the license branch would be closing in about ten minutes. The clerk informed me of the amazing fact that you were allowed to take the exam THREE TIMES on each visit, but if you failed on the third try, you had to return at a later date. I didn’t have enough time to go back and look through the study guide, but the clerk was willing to hand me a new exam to give it another go. Knowing which questions I missed, I was able to figure out the better answers, passed, and didn’t have to return on another day. As an aside… I originally obtained my drivers license in another state where driver’s training was a summer option for high school students. In that state, at that time, there was no separate exam for motorcycles. If I remember correctly, you just paid an extra fee. Later, having that privilege on my license allowed me to avoid having to take a motorcycle training course in California. When I was in the military, there were so many motorcycle injuries and fatalities that the military started its own motorcycle riding course and made it mandatory for those riding motorcycles.
Great! If I’m ever brave enough to take the test again, I’ll fail again because they won’t let me park away from the curb and then I’ll fail by hitting it. I know I’m a good driver, but I hit the damn curb and I can’t do a parell (which is fucking pointless anyway) to save my soul.
Thank you!
hi im 16 and aking my rode test tom am i gonna be able to drive alone or i have to wait till im 17?