
The DS-160 is the application form for a US Visa and gives the US Government a complete background of you, and gives them everything they need to interview you for your visa. This document is somewhat generic and applies to lots of visas but contains a lot of information in it, so be careful!
This form is going to take you some time to fill-in (probably 30 minutes to 2 hours depending on what you need to track down) and will require a history of yourself and travel, so take time and care filling every page in, carefully.
How to start a DS-160
To start the DS-160 you head to this official Government website (and never anywhere else).
The website is awful, and it will constantly crash on you so I highly recommend saving on every single page, and every single time you insert any information. Chrome seemed to work best and definitely don’t do this on your phone.
Never use a site that will file this for you, you should do it on the CEAC.STATE.GOV URL yourself.

- Go to https://ceac.state.gov/genniv/
- Select your location for your interview (see below)
- Copy the code into the CAPTCHA
- Push START AN APPLICATION
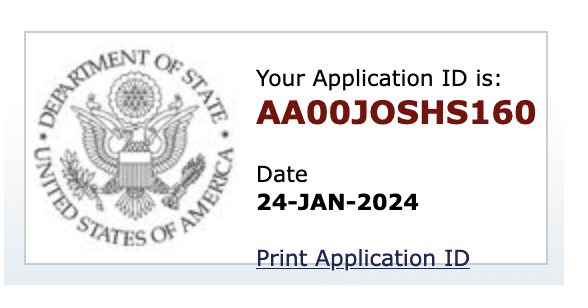
It’s very important you immediately take note of the AA number that you will see on the page as you need this number to recover your application and your life gets difficult if you don’t.
Which DS-160 Location to Select
The DS-160 will ask for a location on it, so it’s important that you select the same location in that, as the location you pick to do your interview (see below if you need to change this).
If this is your first E3 visa application, it’s recommended that you do your appointment in Australia, but you do not have to.
When planning this trip, remember that the appointment wait time estimates on the US State Department website are for US citizens and are wildly inaccurate at that. You, as an Australian are a “third-country national” (First is the US, second is the country with the embassy/consulate and third is you).
Each consulate has a specific number of slots for these kinds of appointments, so the wait times could be very different than those estimates. You can and should, however, take the listed processing times into account.
How to answer the DS-160 questions
The application is broken down into a number of major categories, all of which are as important as each other and must be filled in accurately and carefully. Do not exclude something because you think it might work to your disadvantage, and instead, if you have any concerns, speak to an immigration attorney before submitting it.
- Personal Information: Full name, date of birth, city of birth, country of birth, nationality, other names used, gender, marital status, and personal data.
- Passport Information: Passport number, country of issuance, issue and expiration dates.
- Travel Information: Purpose of your trip, specific travel plans, dates, U.S. contact information.
- U.S. Travel History: Previous U.S. visits or stays, visa refusals, and deportations if any.
- Address and Phone Information: Home address, email, and phone number.
- Family Information: Details about parents, spouse, and children.
- Work/Education/Training Information: Employment history, education background, and training.
- Security and Background: Questions about criminal history, security violations, terrorist activities, disease history, and more.
A few important things to remember when you’re filling it in:
- Accuracy: Ensure all information is accurate and matches the details in your passport and other documents.
- Complete Answers: Incomplete forms can be rejected. Answer all applicable questions.
- Honesty: Always be truthful. Misrepresentations or false statements can result in visa denial.
- Review Before Submission: Once submitted, you cannot make changes to the DS-160 form.
- Confirmation Page: Print and keep the confirmation page with the barcode; it’s required for your visa interview.
- Application ID: Note down your application ID in case you need to retrieve your form later.
- Supporting Documents: Prepare additional documents (e.g., invitation letters, financial proofs) relevant to your visa category.
- Language: The form should be completed in English, except when you are asked to provide your full name in your native alphabet.
How to book an appointment time after you filed your DS-160
To book your appointment, there are two major websites that you’ll be directed to, and which one you use will depend on where you’re headed for the appointment: http://ustraveldocs.com/ and https://ais.usvisa-info.com/.
As there is no clear guidance about which country uses which application tool, I generated a complete list that you can follow here.
These two websites are the portals to booking your appointment and will take payments and track your progress throughout.
You create an account, select a location, and then proceed through the steps that it tells you. It likely tells you to start with a DS-160 because that’s your ticket into getting an interview. You will then have to pay a fee to see the available appointments. This fee is non-transferable to another location and you can’t see the calendar of available appointments before paying. It’s a huge pain, but you have to take a bit of a gamble and just push forward.
Once you pay you should be presented with a calendar of options. If there are no appointments available it means that all the appoints for the next booking period (normally a couple months) are booked out. Keep refreshing this page all the time and you will likely see an appointment appear as somebody else canceled. Otherwise you will just have to wait until you see a spot open up.
How to update a DS-160 that you entered incorrectly or need to change interview location
If you get things wrong in this document you’ll have to do it all over again, which is a monumental pain.
If you need to change the location of your interview after doing your DS-160, my recommendation is to do a new DS-160 and then update the consulate (either online through the portals below, or by contacting them directly). If you can’t get in touch and update it, just take both printed out confirmation pages and explain the situation. You should be fine (but don’t rely on having ONLY one with the wrong location on it).
You might also like
 Related to: AppointmentGetting an E3 Visa in Bridgetown, Barbados in 2026
 Related to: InterviewE3 Visa Interview – 8 things to remember in 2026
 Related to: Visa Application TravelUS Visa Consulate Trip Travel Hacks in 2025
 Related to: E-3 Visa Interview RequirementsE-3 Visa Applicants May Now Have to Interview in Australia for New Visas & Renewals
 Related to: Vocational Student VisaM1 Visa – Visas for Studying in the United States in a Vocational Program in 2026Related to: VisaO1 Visa – Individuals with Extraordinary Ability or Achievement 2026


If my employer has provided me a job offer, and they have not yet submitted the LCA yet or got it certified, can i complete my DS-160 and say ‘no’ in response to ‘do you have an approved LCA?’ and then later update this, or will i then need to re-do the ds-160 and cancel the interview so that it matches up with the latest DS-160?
Yeah you can say no, then just take it in with you – no need to update 160 from what I know.
I have an apostrophe in my name that appears on my passport, whereas the CEAC ds-160 application does not allow apostrophe’s. WIll this cause a problem?
Hi, I am filling DS-160 Form, my location of birth is different from my current nationality, I have dual nationality. When I want to put my other nationality, it says error, as it says you put this nationality before. ( at birth section)
but if I put no other nationality apart from current one, where I live,
Then when I should put my other passport Number?
Thank You
I don’t have a confirmed job offer yet, but it’s looking very likely and I want to get over there as soon as possible. Is there any harm in me filling out the DS-160 now, so that I can secure an appointment for in a few weeks time by which time I should have everything confirmed and have an LCA?
No problem but you will have to say no to the LCA question, and then yes later when you re-file.
On this, do you need to re-pay and submit a NEW DS-160, or are you able to update the previous one? I saw in another post that you mentioned you’ll get a new application number and need to reflect this in your appointment booking carefully.
I was told that you don’t need to pay for an application/appointment BEFORE seeing all the available appointment times. Is this inaccurate info?
Seems pretty unfair that they’d make you pay for an appointment before you even know if it’s in your desired timeframe.
Yep unfortunately that’s inaccurate, and yep, it’s awful!